From Zero to Hero - A Data Scientist's Guide to Hardware Part 2

Author: Carlos Salas Najera
In the realm of data science, selecting the right hardware is crucial for optimising performance and efficiency. As discussed in a previous article, the choice between hardware alternatives is just the beginning. For those involved with deep learning workflows, where immense computational power is required, remote GPU selection plays a pivotal role. The game so far has been dominated by Nvidia and GPUs such as A100 and H100 offering remarkable performance at competitive prices.
In this article we will delve into the upcoming new Blackwell chip as well as covering how to configure a laptop to leverage the power of local GPUs when using deep learning libraries like Pytorch.
1. Revisiting GPUs
Local and remote GPUs offer different solutions for computational tasks, each with its own advantages and considerations.
On the one hand, local GPUs are those installed directly on a user's device, such as a laptop or desktop computer. They are typically categorised into two main types:
- Integrated GPUs: Integrated GPUs are built into the CPU chip or the motherboard, sharing power resources. While they are sufficient for basic computing needs like web browsing and office tasks, they lack the power needed for demanding tasks like deep learning. Examples of integrated GPUs include Intel® Iris Xe graphics and AMD Radeon™ graphics. These GPUs are well-suited for lightweight data science operations but may not have the capability for more intensive tasks.
- Discrete GPUs: Discrete GPUs are separate components from the CPU and have their own dedicated graphics memory (VRAM). They offer higher performance and are capable of handling more demanding tasks such as deep learning training. Examples include the NVIDIA RTX series or AMD Radeon RX series.
On the other hand, remote GPUs, also known as cloud GPUs, are located on remote servers or in the cloud and accessed over a network connection. They offer scalable computing power without the need for users to invest in expensive hardware:
- Cloud service providers like AWS, GCP, and Azure offer remote GPU instances on a pay-as-you-go basis.
- Remote GPUs are beneficial for tasks that require more computational power than what is available on local machines. This includes training large deep learning models, running simulations, or performing high-performance computing (HPC) tasks.
- Remote GPUs enable users to access scalable resources on-demand and can be particularly useful for distributed team environments or for sharing resources across projects.
As highlighted in the previous article (source: author), Nvidia’s A100 and H100 are among the most popular GPUs deployed by deep learning and Generative AI researchers:
- A100: The 'A' stands for Ampere, which is the architecture of the GPU. It is a high-performance GPU accelerator designed for data centres and is widely used in cloud computing environments for tasks such as training deep learning models, running inference, and performing high-performance computing (HPC) workloads.
- H100: The 'H' stands for Hopper, which is the architecture succeeding Ampere with higher performance, particularly to deal with more demanding deep learning workloads and basic generative AI projects.

In summary, local GPUs provide on-device processing power for tasks, while remote GPUs offer scalable and flexible computing resources accessible over the internet. Both play crucial roles in data science workflows, depending on the specific requirements of the tasks at hand and the available hardware resources.
2. Blackwell: A New Breakthrough
Circling back to the previous table, both A100 and H100 are architectures initially designed to be competitive for deep learning workflows. However, their utility falls short on Generative AI tasks such as training GPT models: enter Blackwell microarchitecture.
The NVIDIA Blackwell architecture is named in honour of David H. Blackwell, a remarkable and inspiring American mathematician and statistician renowned for his work, including the Rao-Blackwell Theorem. Blackwell made significant contributions to probability theory, game theory, statistics, and dynamic programming.
Blackwell microarchitecture is an important milestone due to these facts:
- Blackwell in a nutshell: Blackwell architecture GPUs boast 208 billion transistors crafted using a custom TSMC 4NP process. All Blackwell variants incorporate two reticle-limited dies interconnected by a 10 terabytes per second (TB/s) chip-to-chip link, forming a unified single GPU. For more information about the technical specifications, the official document can be found here.
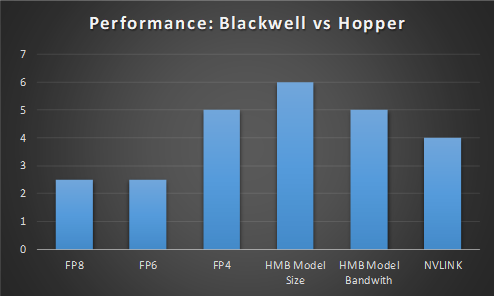
- The numbers: As expected, Blackwell GPU outscores its predecessor H100’s (Hopper architecture) previous achievements as showcased in the next chart (source: Nvidia). For instance, a Blackwell GPU can process models with 6x more parameters than Hopper. In addition, Blackwell-based GPU’s are expected to provide up to 10 PetaFLOPS of FP8 performance with sparsity, which represents a 2.5x increase over the H100's rate. Additionally, it can deliver an impressive 20 PFLOPS of FP4 performance for inference, a format the H100 doesn't even support. When compared to its minimum FP8 data size, the B200 should offer a 5x increase in raw inference throughput when FP4 can be utilised.
- Blackwell variants: NVIDIA plans to release three variants of Blackwell-based accelerators: GB200, B200, and B100. The flagship GB200, featuring two Blackwell GPUs and a 72-core Grace CPU, targets the highest performance levels, capable of delivering 20 PFLOPS of sparse FP4 computational performance per GPU.
- Transistor Density Enhancements: the manufacturing process uses a custom-built TSMC 4NP process that allows to increase the number of transistors per chip AKA transistor density. To put it into perspective, the GB100 die contains 104 billion transistors, marking a 30% increase compared to the previous generation Hopper GH100 die.
- Deep Learning & AI Lab capabilities: CUDA Compute Capability 10.0 is introduced with Blackwell along with 5th Generation Tensor Cores for AI compute and performing floating-point calculations. Blackwell's 2nd Generation Transformer Engine allows FP32 to be divided further, doubling FP8 compute performance. These variety of floating-point formats makes it possible to strike a balance between computational efficiency and precision, making it suitable for various AI tasks.
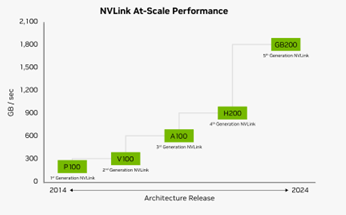
- Multi-GPU input and output (IO) Scalability: Blackwell uses a 5th Generation NVLink protocol that allows more GPUs to communicate with each other in a data centre setup with Nvidia claiming this technology allows low latency communication for up to 576 GPUs and 1,800 GB/s bandwidth per GPU compared to Hopper’s architecture 8 GPUs and 900 GB/s respectively.
- GB200 “Superchip”: The GB200 essentially combines two G200 GPUs using NVLink technology to connect them. Nvidia asserts that the GB200 can deliver 30x the performance for LLM inference workloads compared to the previous H100 with a 25x lower energy consumption.
- Coming soon for laptops: Although Blackwell will be only initially available via remote GPU service, Nvidia also expects to commercialise it in the next generation of GeForce graphic cards (RTX 5000 Series).
- Environmentally friendly: Nvidia’s CEO Jensen Huang stated that once released, the Blackwell chips will essentially quadruple the efficiency of AI model training. Currently, training an AI model takes 90 days and requires 8,000 H100 GPUs and 15 megawatts of power. With Blackwell chips, a similar model could be trained over the same period with just 2,000 B100 GPUs and 4 megawatts of power.
- Expensive as expected: a Blackwell GPU could cost north of $50,000 compared to the $40,000 price tag of H100.
- The promise: NVIDIA seeks with its Blackwell products to democratise Generative AI i.e. any enterprise will be able to use and deploy state-of-the-art LLMs with affordable economics. Moreover, data centres are evolving into AI factories, where intelligence generation becomes paramount. Blackwell is instrumental in this shift, offering the computational power and efficiency needed to generate revenue and insights.
3. CUDA Configuration: Harnessing the Power of Local GPUs
This section will be a quick guide for those readers with local GPUs willing to configure them for deep learning tasks using PyTorch library, Nvidia GPU and Windows as an operating system. This configuration process may be intricate and time-consuming for first-time users. Therefore, it will be detailed step by step:
1. Check Nvidia Drivers
2. Install Cuda Toolkit
3. Install cuDNN library
4. Install PyTorch library version with CUDA support.
1. Check Nvidia Drivers
Nvidia drivers act as the crucial intermediary between the operating system and the GPU hardware. They enable the OS to recognise and communicate effectively with the GPU, ensuring that the hardware can be utilised for various computational tasks.
Although drivers are usually pre-installed by the laptop manufacturer, there are several ways to check whether your laptop has GPU drivers installed:
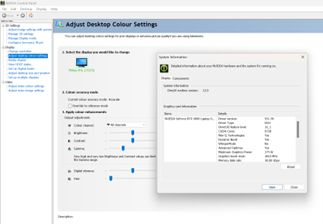
- Go to Windows search or right-click on your desktop to select NVIDIA Control Panel. From the NVIDIA Control Panel menu, select Help > System Information. The driver version is listed at the top of the Details window.
- Go to Windows search and type “Device Manager”. Go to “Display Adapters”, select the available GPU, right-click and then select “Properties”. Select the “Driver” tab and read the Driver version. The last 5 digits are the NVIDIA driver version number.
An alternative way to obtain information about driver requirements is by using the “nvidia-smi” command in a terminal. Nvidia-smi (also known as NVSMI) is a command-line utility tool that monitors and manages NVIDIA GPUs, including Tesla, Quadro, GRID, and GeForce models. It is installed with the CUDA toolkit and provides valuable insights by itself but also allows you to extract additional value to manage GPU performance as shown in this cheat-sheet and this article.
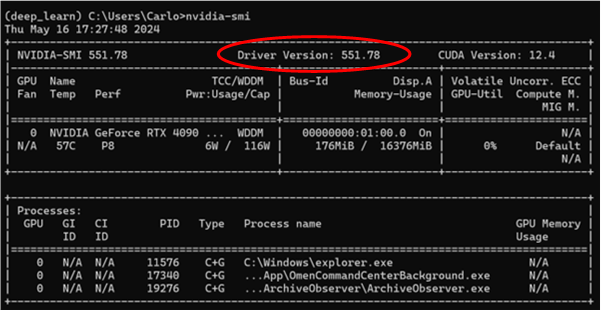
As observed, a basic command “nvidia-smi” provides essential identification information. The first line displays the version of nvidia-smi and the installed NVIDIA driver version. Below are explanations of some key fields:
- CUDA Version: Indicates the version of Compute Unified Device Architecture (CUDA) compatible with the installed drivers.
- 0: Represents the GPU ID, which is useful in systems with multiple GPUs.
- Fan, Temp, Perf, Pwr: Shows the current fan speed, temperature, performance state, and power usage, respectively, of the GPU.
- Memory-Usage: Indicates how much GPU memory is currently in use.
- GPU-Util: displays the percentage of the GPU's computational capacity currently in use.
- Compute M: Displays the current compute mode of the GPU.
If it becomes necessary to install drivers due to a recent change of GPU, please refer to this link. Users only need to follow the instructions to get a set of drivers compatible with their Nvidia GPU specs. Once the drivers are installed, restart your laptop, open a terminal (Command Prompt or shell), and type “nvidia-smi” to see a table with the GPU information.
2. Install Cuda Toolkit
CUDA Toolkit is a software development kit (SDK) provided by NVIDIA for parallel computing using NVIDIA graphics processing units (GPUs). In other words, CUDA Toolkit provides developers with the necessary tools and libraries to leverage the parallel processing power of NVIDIA GPUs for a wide range of applications, including scientific computing, deep learning, computer vision, and more.
Here's a breakdown of its key components:
- CUDA Runtime: The core runtime libraries and APIs that enable parallel programming on NVIDIA GPUs. This includes APIs for memory management, kernel launching, and device management.
- CUDA Driver: The driver component enables communication between the CUDA runtime and the GPU hardware. It provides low-level access to the GPU for CUDA applications.
- NVIDIA Compiler (NVCC): The CUDA compiler translates CUDA code (written in CUDA C/C++ or CUDA Fortran) into executable code that can run on NVIDIA GPUs.
- CUDA Libraries: Pre-built libraries optimised for GPU acceleration, including cuBLAS (Basic Linear Algebra Subprograms), cuFFT (Fast Fourier Transform), cuSPARSE (Sparse Matrix Operations), and more.
- CUDA Tools: Development tools such as nvprof (profiler), nvcc (compiler), and nvlink (linker) for building, debugging, and profiling CUDA applications.
- CUDA Samples: Sample codes demonstrating various CUDA programming techniques and features.
Before installing CUDA, it is important to set up the necessary environmental variables to provide the paths required for CUDA to function properly. To set up the environmental variables, follow these steps:
- Open the Environmental Variables settings in Windows. You can access this by searching for "Environmental Variables" in the Start menu.
- In the Environmental Variables window, navigate to the "Path" variable under the "System Variables" section.
- Edit the "Path" variable and add the following paths. Beware the CUDA version recommended from running “nvidia-smi” was 12.4
C:\Program Files\NVIDIA GPU Computing Toolkit\CUDA\v12.4\bin
C:\Program Files\NVIDIA GPU Computing Toolkit\CUDA\v12.4\libnvvp
C:\Program Files\NVIDIA GPU Computing Toolkit\CUDA\v12.4\extras\CUPTI\lib64
C:\Program Files\NVIDIA GPU Computing Toolkit\CUDA\v12.4\include - Click "OK" to save the changes.
The environmental variables are now set, allowing CUDA to locate the necessary files and libraries. To download the CUDA toolkit, go to the official Nvidia download page. Select your operating system, architecture, distribution, and version. Once the executable installation file is downloaded, execute it and follow the instructions.
3. Install cuDNN Library
cuDNN (CUDA Deep Neural Network Library) is a GPU-accelerated library designed for deep neural networks, providing highly optimised implementations of key deep learning primitives like convolution and pooling operations. To install cuDNN, follow these steps:
- Visit the Nvidia website and log in to your Nvidia developer account. If you don't have an account, create one (complimentary).
- Download the cuDNN package suitable for the required CUDA version (e.g. cuDNN for CUDA 12.4).
- Once downloaded, unzip the cuDNN package to a directory of your choice.
- Add the following paths to your environmental variables. These paths should point to the location where you extracted the cuDNN files:
C:\path\to\cuda\bin
C:\path\to\cuda\lib\x64
C:\path\to\cuda\include - Click "OK" to save the changes.
cuDNN can become an uphill struggle so an in-depth explanation with more details can be found in Nvidia’s official cuDNN website.
4. Install PyTorch library version with CUDA support
Before installing any deep learning library, you should create a new environment to be used exclusively for deep learning projects for the following reasons:
- Dependency: Deep learning libraries often require specific versions of various packages so a specific environment ensures there will be no conflicts with those needed for other projects.
- Isolation: By using a specific environment, you keep your project's dependencies isolated from the global Python installation, which prevents issues where updating a library for one project could potentially break another project.
- Reproducibility: Environments make it easier to reproduce the development setup on different machines.
- Cleaner System: Keeping your global Python installation clean and free of project-specific dependencies avoids clutter and reduces the risk of system-wide conflicts.
For illustration purposes, the reader can enter the next commands via terminal:

Once the new environment is activated using the last command, the reader can proceed to the installation of deep learning libraries. That said, different versions of libraries such as PyTorch and Tensorflow are compatible with specific versions of CUDA. Each release of these frameworks is tested and optimised for certain CUDA versions to ensure stability and performance. Readers can visit PyTorch and TensorFlow online guide to obtain the correct version to be installed.
To focus on PyTorch installation, we can visit the PyTorch website and fill the “Install PyTorch” questionnaire to obtain the correct command to be used in the terminal. Remember you can check the correct CUDA version using “nvidia-smi” or “nvcc -version” in your terminal.

Once the installation is completed, you should reboot the laptop. Once a new Python session is launched, GPU availability via PyTorch can be tested using the next commands:
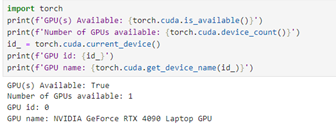
If you need to start over because PyTorch is still not communicating with the GPU, you can remove your current environment and packages using your command line interface as follows:

If PyTorch has successfully communicated with the GPU, a simple script can be used to verify is working correctly as highlighted in the next code snippet:
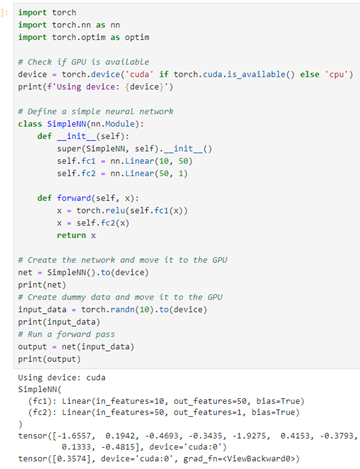
This setup will enable you to leverage the full power of a local GPU for deep learning tasks using PyTorch.
Conclusions
This article explored the critical decisions involved in selecting hardware for data science, particularly the use of local versus remote GPUs. It detailed the advantages and use cases of both local GPUs (integrated and discrete) and remote GPUs, emphasiszing their roles in optimizing computational tasks for deep learning workflows.
The article also covered the Nvidia Blackwell chip, highlighting its advanced architecture, superior performance metrics, and potential impact on deep learning and AI model training. The Blackwell chip, with its high transistor density and new features like the 5th Generation NVLink protocol and Transformer Engine, promises significant improvements in computational efficiency and performance.
Finally, we provided a step-by-step guide to configuring a laptop for deep learning tasks using a local GPU, covering Nvidia driver checks, CUDA Toolkit installation, cuDNN setup, and PyTorch library installation. This guide is intended to help users harness the full power of their local GPUs for deep learning, ensuring optimal performance and efficiency.
Sources and Links of Interest:
• CUDA compatible GPUs
• PyTorch GPU installation
• TensorFlow GPU installation
• Arxiv GPU Benchmarking Search
• Google Colab Lab Session: Using Cloud GPUs on Google Colab Notebooks
PIC and Links
L/S Portfolio Manager | Lecturer & Consultant
• https://www.linkedin.com/in/csalasls/
• https://twitter.com/CarlosSNaj